Configuration Guide
This page explains the configuration process and key considerations for ReleaseTracker.
1. Log In
Log in with the default username admin and password admin.
Change the default password immediately
After logging in, change your password right away: open the bottom-left user menu → User Settings → Change Password. Leaving the default credentials on a publicly accessible instance allows anyone to take over.
2. System Settings
Global Configuration
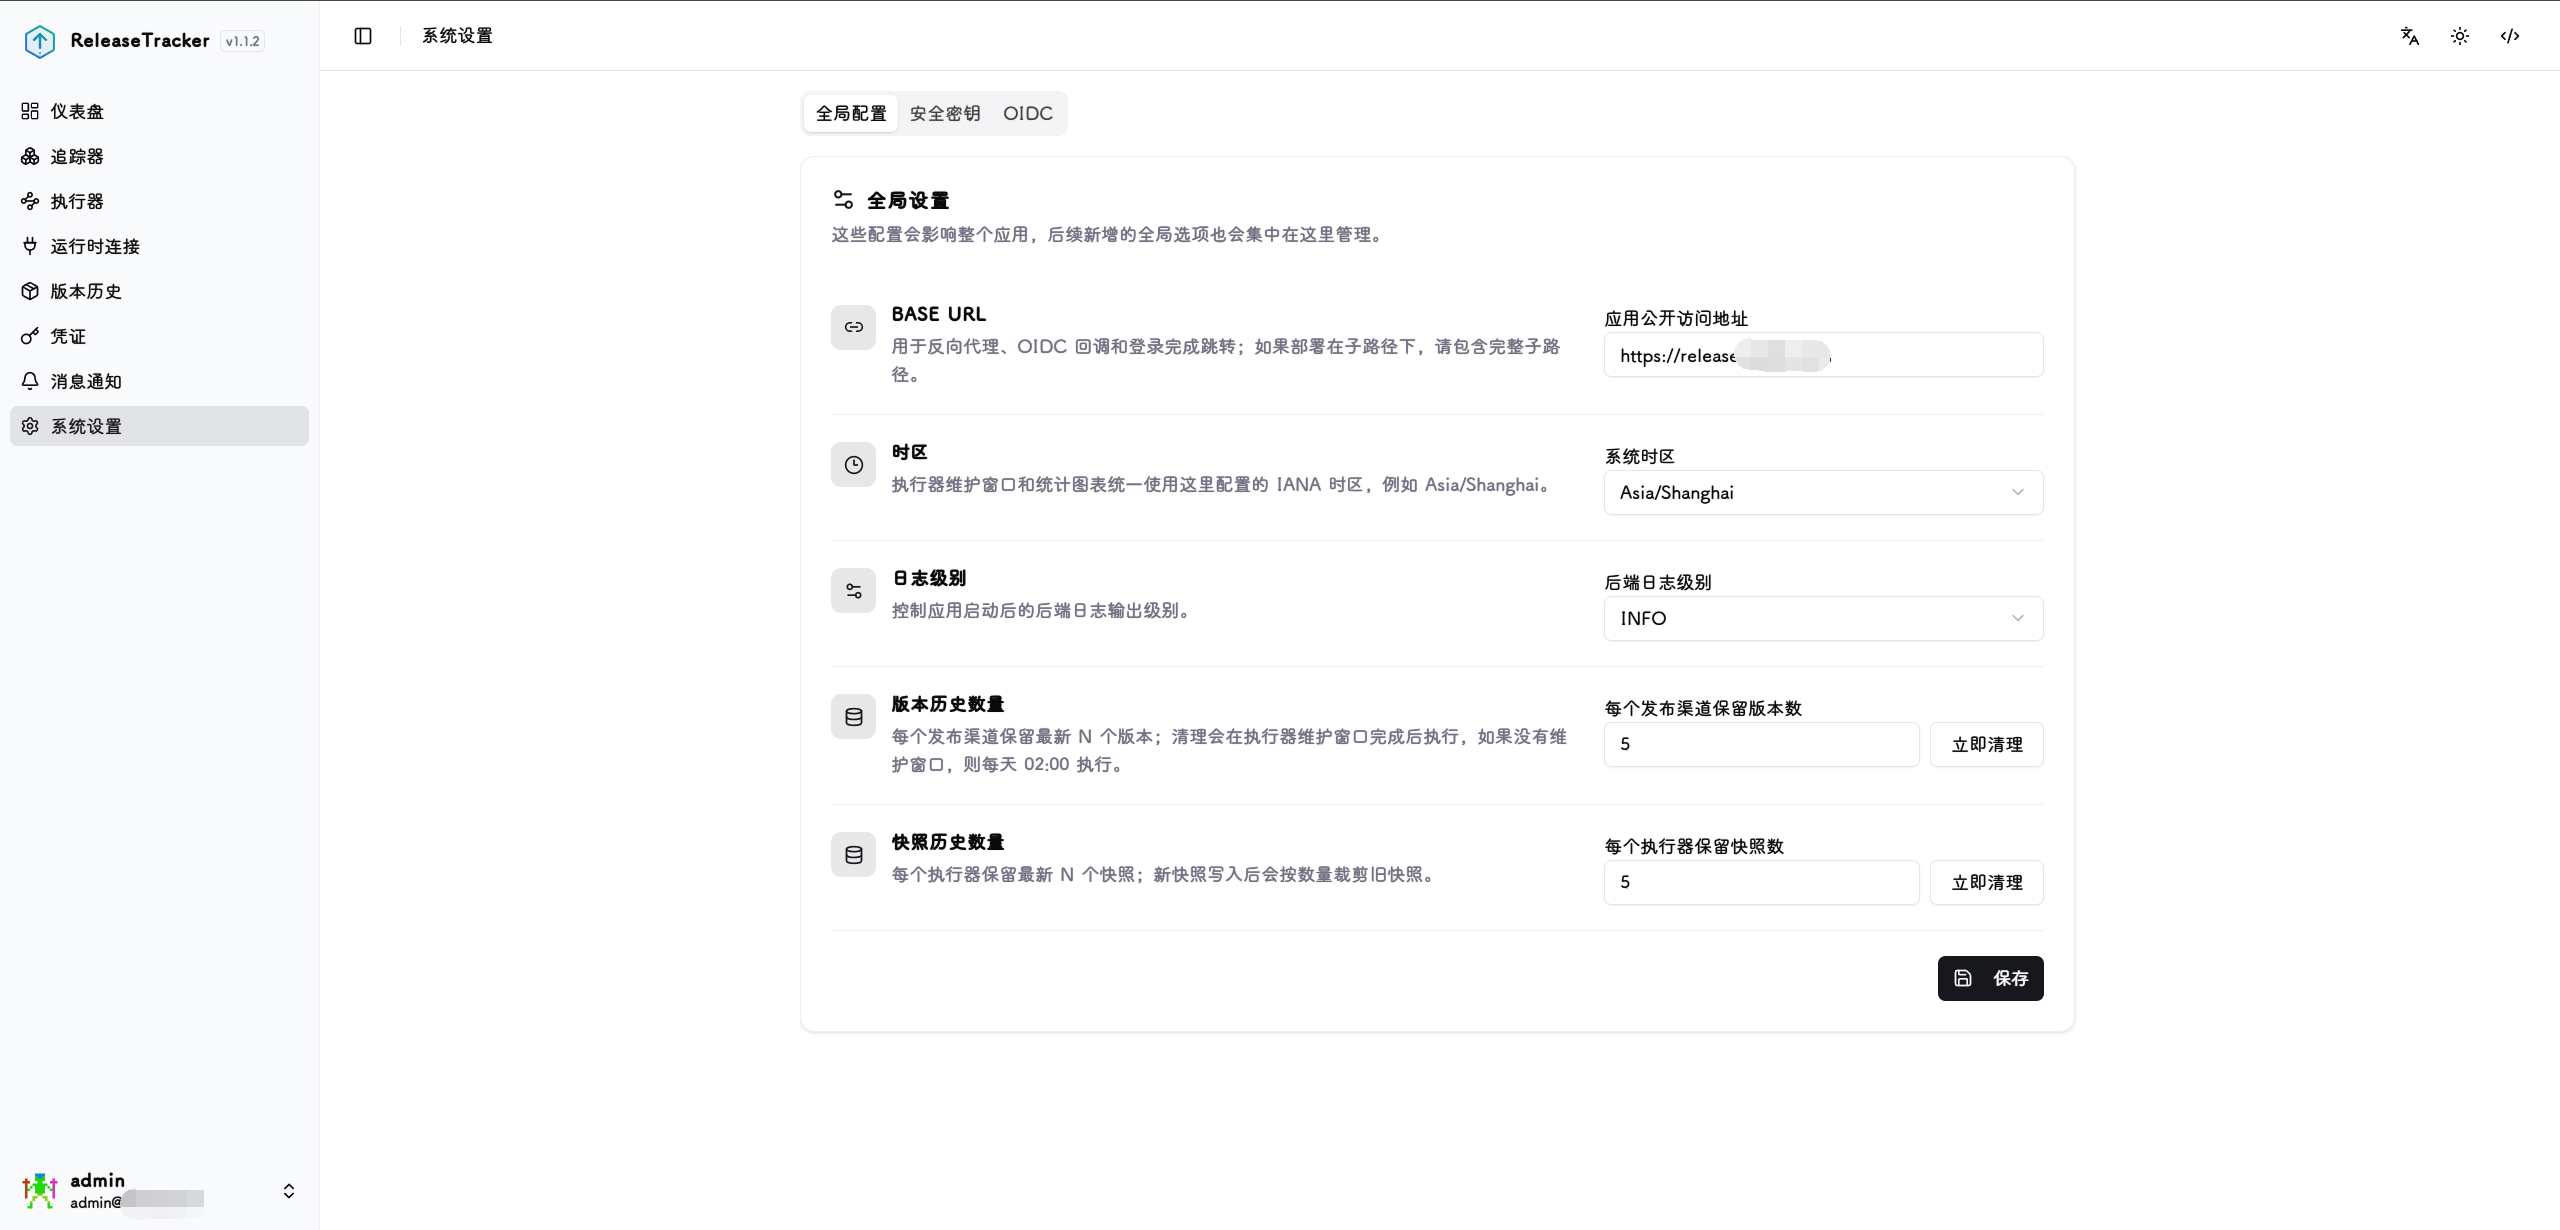
Base URL : The externally accessible address of this instance. Used for notification links and OIDC callback URLs — must match the actual URL used to access the instance.
Timezone : Affects date grouping in version history and the scheduling of executor maintenance windows.
Log Level : Controls the verbosity of backend logs. Options: info, warning, error, debug.
Version History Count : Number of historical versions retained per source and release channel. Older entries beyond this limit are automatically pruned when a new version is discovered.
Snapshot History Count : Number of snapshots retained per executor. Older snapshots beyond this limit are automatically pruned when a new pre-update snapshot is captured.
Security Keys
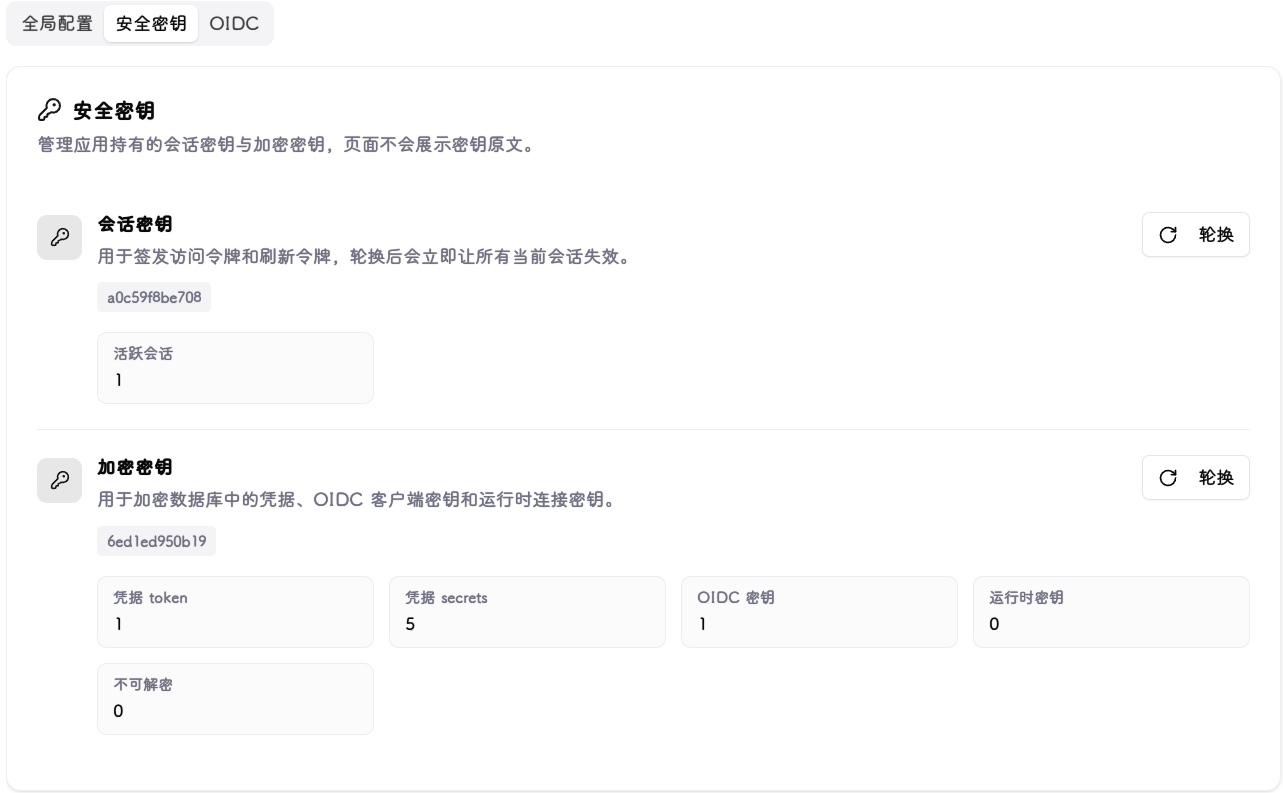
Session Key : Used for JWT session signing. Rotating this key forces all currently logged-in users to log out and re-authenticate.
Encryption Key : Used for Fernet encryption of credentials and secret data. Rotating this key re-encrypts all stored encrypted data. This operation is irreversible — ensure you have a backup before rotating.
These keys are used for data encryption and user session encryption.
OIDC
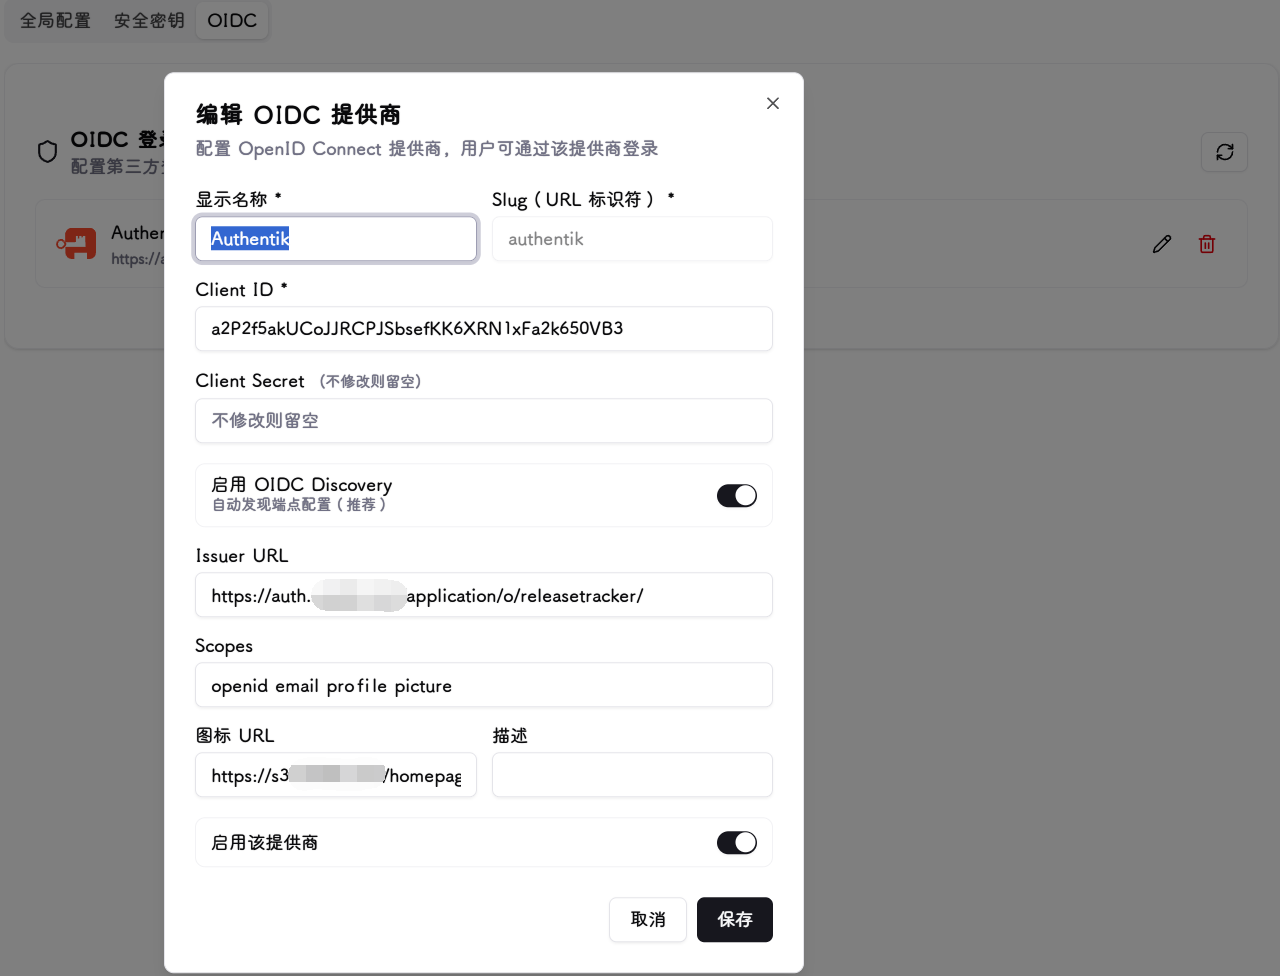
Integrates with enterprise or personal SSO providers for unified identity authentication. Currently supports configuring one OIDC provider at a time.
Basic Fields
Display Name : The provider name shown on the login page button, e.g. Authentik.
Slug : URL identifier. Cannot be changed after creation. Used to construct the OIDC callback URL. Only lowercase letters, numbers, and hyphens are allowed.
Client ID : The client ID obtained after registering the application with the OIDC provider.
Client Secret : The corresponding client secret. Leave blank when editing to keep the existing value.
Endpoint Configuration
Enable OIDC Discovery : When enabled, only the Issuer URL is required — the system automatically discovers the authorization, token, and userinfo endpoints (recommended).
Issuer URL : Required when Discovery is enabled, e.g. https://your-idp.example.com.
Authorization URL : Manually specify the authorization endpoint when Discovery is disabled.
Token URL : Manually specify the token endpoint when Discovery is disabled.
Userinfo URL : Manually specify the userinfo endpoint when Discovery is disabled.
Other Fields
Scopes : Requested permission scopes. Defaults to openid email profile. If the provider supports an avatar field (e.g. picture), add the corresponding scope here to sync the user avatar at login.
Icon URL : The provider icon displayed on the login page button. Leave blank to show the initials instead.
Description : Optional notes.
Enable this provider : When disabled, this provider will not appear on the login page.
3. Notifications
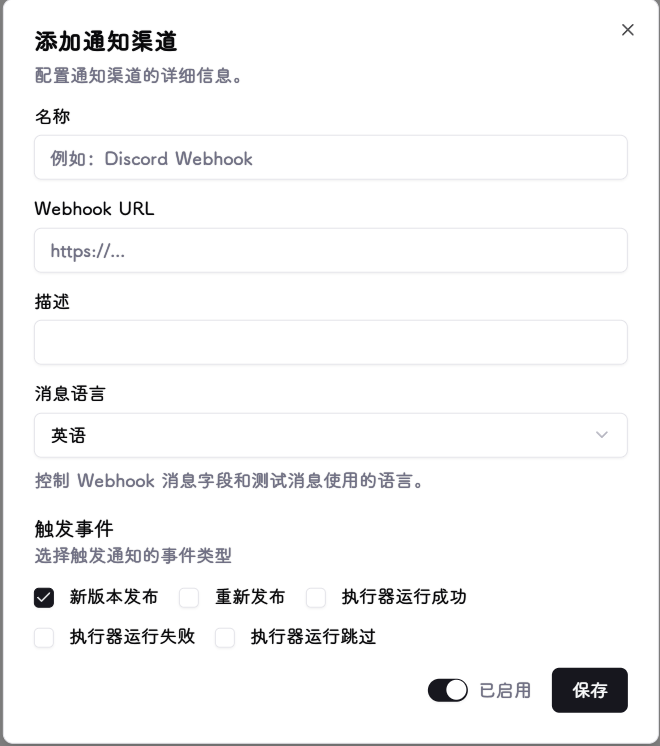
Currently only Webhook type is supported, compatible with Discord, Slack, and any service that accepts JSON POST requests.
Notification Fields
Name : Display name for the notifier, useful for distinguishing multiple notification targets.
Webhook URL : The destination address for notifications. The system sends an HTTP POST request with a JSON body to this URL.
Description : Optional notes.
Message Language : The language for notification messages. Options: Chinese or English.
Trigger Events : Select the event types that should trigger notifications (multiple selections allowed):
- New Release: triggered when a new version is detected.
- Republish: triggered when a new build is published under the same version tag (e.g. two releases with the same tag but different commit hashes).
- Executor Run Succeeded: triggered when an executor completes a version update.
- Executor Run Failed: triggered when an executor update fails.
- Executor Run Skipped: triggered when an executor skips a run due to policy or unmet conditions.
Enabled : When disabled, this notifier will not send any messages, but the configuration is retained.
After configuring, use the Send Test button in the action menu to send a test message to the target address and verify connectivity.
4. Credentials
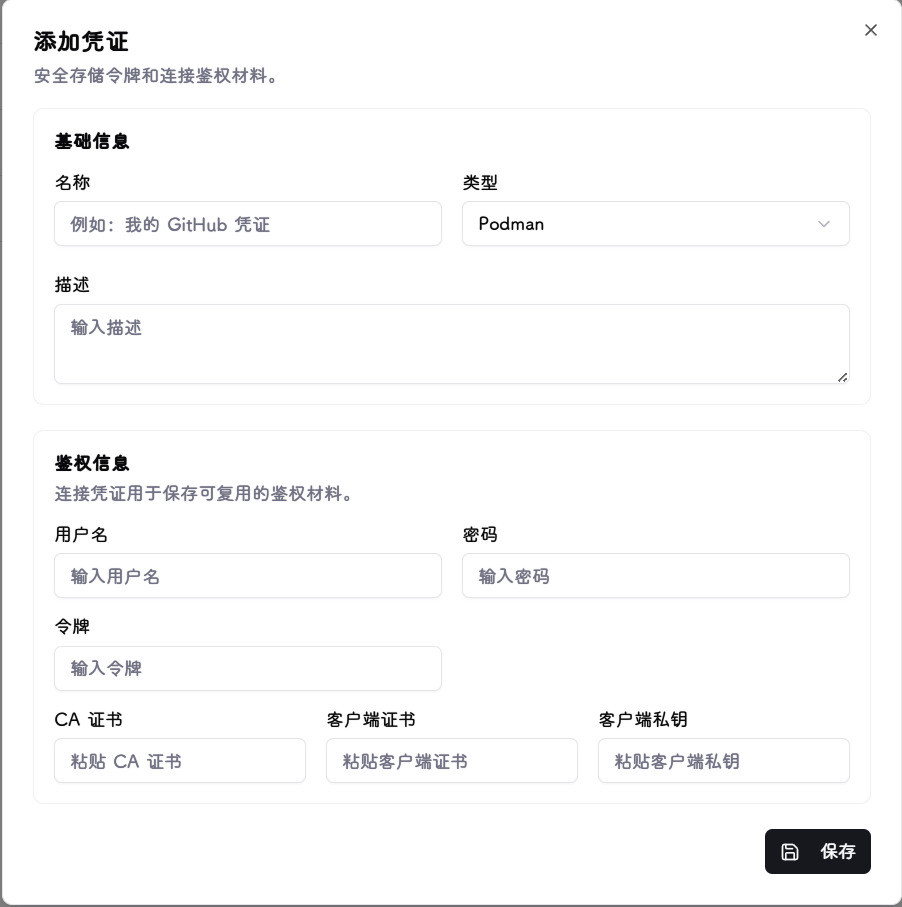
Credentials store the authentication material needed to access various platforms. All data is encrypted by the unified encryption module before being stored in the local database.
Supported Credential Types
| Type | Purpose |
|---|---|
| GitHub | GitHub Personal Access Token (PAT) for GitHub tracker sources. Enter a token starting with ghp_. |
| GitLab | GitLab Personal Access Token for GitLab tracker sources. Enter a token starting with glpat-. |
| Gitea | Gitea application token for Gitea tracker sources. |
| Helm Chart Repository | Basic Auth credentials for Helm repositories, in username:password format. |
| Container Registry | Username and password/PAT for private container registry tracking. |
| Docker | Optional TLS certificates (CA cert, client cert, client key) and username/password for Docker runtime connections. |
| Podman | Optional TLS certificates and username/password for Podman runtime connections, same format as Docker. |
| Kubernetes | Authentication material for Kubernetes runtime connections: supports kubeconfig files, Bearer Tokens, client cert/key, and CA certificates. |
| Portainer | Portainer API key for Portainer runtime connections. |
5. Runtime Connections
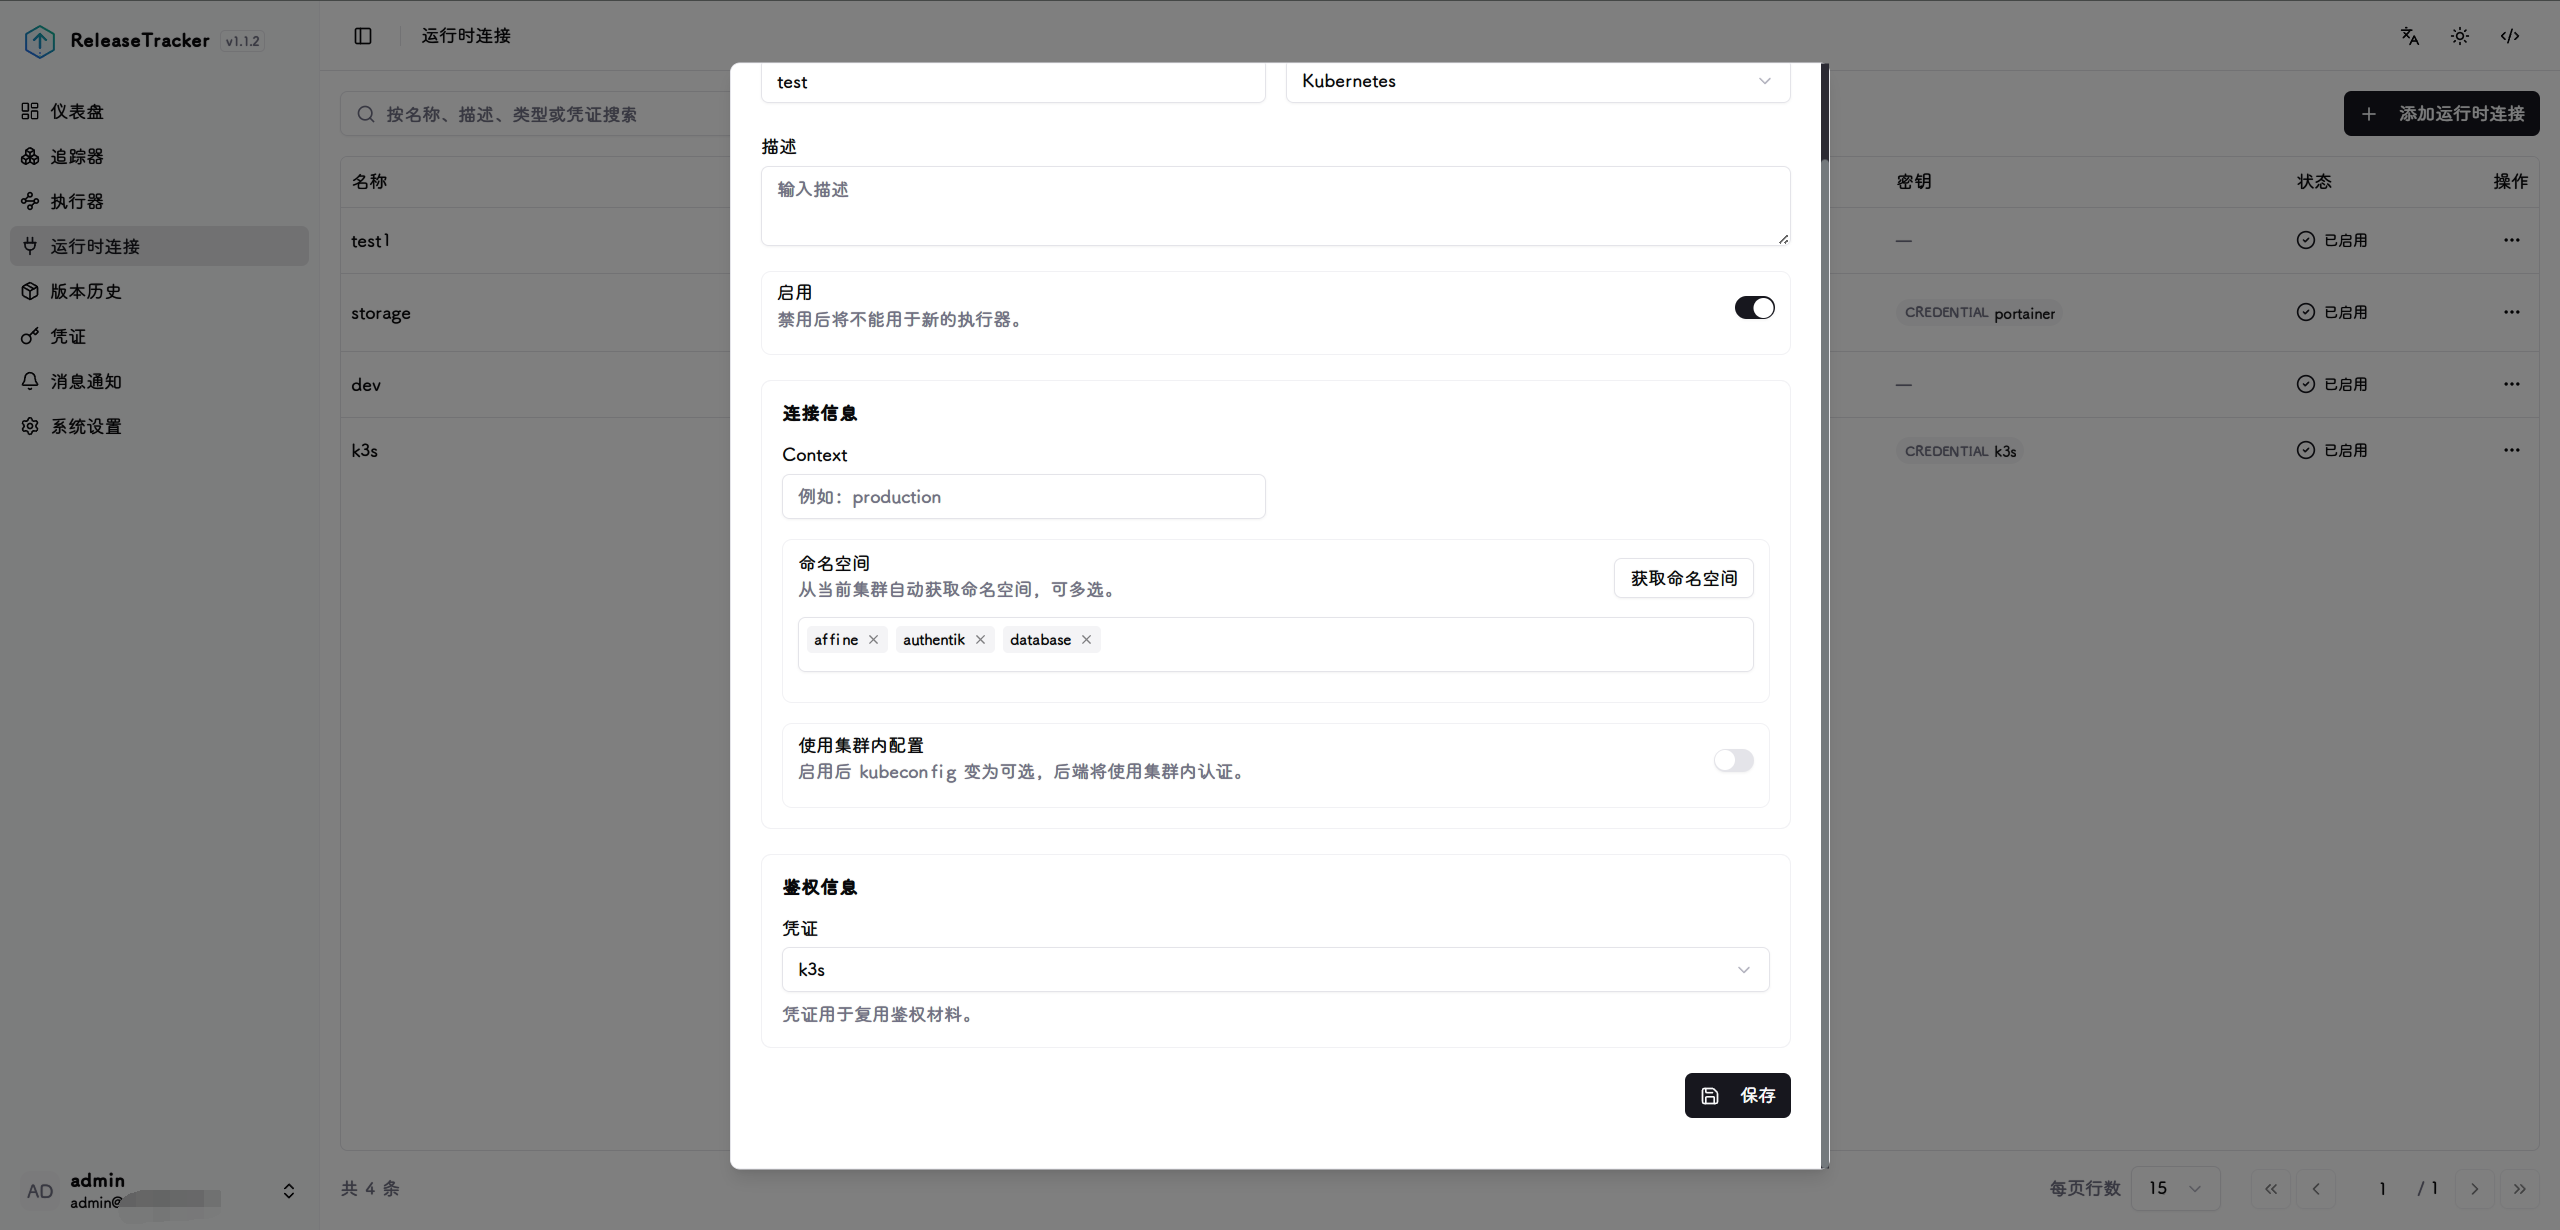
Runtime connections link to the infrastructure running your containers or services. Configuration varies by type:
- Docker / Podman: Enter the socket path (e.g.
/var/run/docker.sock) or TCP address (e.g.tcp://host:2375). The system communicates with the container engine via this address. - Kubernetes: Upload or paste kubeconfig file contents, or select in-cluster mode when deploying inside a cluster. The system uses the corresponding credentials to access the cluster API.
- Portainer: Enter the Portainer instance address and API token. After connecting, select the target endpoint. The system manages containers and stacks through the Portainer API.
Common Fields
Name : Display name for the connection.
Type : Select Docker, Podman, Kubernetes, or Portainer.
Description : Optional notes.
Enabled : When disabled, this connection is excluded from executor target discovery.
Docker / Podman Fields
Socket / Host Address : Unix socket path or TCP address, e.g. /var/run/docker.sock or tcp://192.168.1.10:2375.
API Version : Optional. Leave blank for automatic negotiation.
TLS Verification : When enabled, requires the server to present a valid TLS certificate. Use together with a CA certificate in the credential.
Credential : Optional. Select a Docker/Podman credential containing TLS certificates or username/password.
Kubernetes Fields
In-Cluster Mode : Enable when ReleaseTracker is deployed inside a Kubernetes cluster. Automatically uses the ServiceAccount credentials.
Credential : Select a Kubernetes credential containing a kubeconfig or Token/certificate (not required in in-cluster mode).
Namespaces : Optional. Restrict target discovery to specific namespaces (multi-select). Leave blank to discover all accessible namespaces.
Portainer Fields
Instance Address : The Portainer access URL, e.g. https://portainer.example.com.
Endpoint ID : The ID of the target environment in Portainer.
Credential : Select a Portainer credential containing the API key.
6. Trackers
![]()
Adding a Tracker
![]()
![]()
![]()
Tracker Identity
Tracker Name : Unique identifier for the tracker. Cannot be changed after creation.
Description : Optional notes.
Enabled : When disabled, the configuration is retained but the tracker is excluded from scheduled checks.
Tracking Channels
Each tracker can contain one or more tracking channels, each corresponding to an upstream source.
Channel Key : Unique identifier for the channel, e.g. upstream-release.
Channel Type : Select the upstream platform type. Supported types:
- GitHub: Enter the
Repository (owner/repo), e.g.kubernetes/kubernetes. Optionally configure theGitHub Fetch Mode. - GitLab: Enter the
Project ID/Path(e.g.group/project) andInstance URL(for self-hosted instances; leave blank for public GitLab). - Gitea: Enter the
Repository Path (owner/repo)andInstance URL. - Helm Chart: Enter the
Chart Name(e.g.nginx) andChart Repository URL(e.g.https://charts.bitnami.com/bitnami). - Container Registry: Enter the
Image Name(e.g.example/app) andRegistry Address(e.g.ghcr.io). Optionally configurePublished At Mode.
Credential : Optional. Select a credential of the matching type for private repositories or sources requiring authentication.
GitHub Fetch Mode : Visible for GitHub type only. GraphQL-first mode requires a personal PAT credential and provides more accurate data — recommended. REST-first mode requires no credential but may miss versions for frequently updated projects; increase Fetch Depth to compensate.
Published At Mode : Visible for container registry type only. Controls how the image version's publish time is determined:
- Auto: Automatically selects based on registry type.
- Always try to read real build time: Reads the actual build time from the image config.
- Use first observed time only: Uses the time the system first discovered this image tag.
Release Channels
Each tracking channel can have one or more release channels, used to classify and filter versions using regular expressions.
Release Channel Type : Select the channel category: stable, prerelease, beta, or canary.
Release Type : Visible for GitHub, GitLab, and Gitea types only. Filters by upstream release status: Release or Pre-Release.
Include Pattern : Only versions matching this regex are included in the release channel. Leave blank to include all versions.
Exclude Pattern : Versions matching this regex are excluded, even if they match the include pattern. Leave blank to exclude nothing.
Fetch Preferences
Check Interval (minutes) : How often to check for version updates. Default: 360 minutes.
Fetch Depth : Maximum number of versions to fetch from upstream per check. Default: 10. Increase for frequently updated projects to avoid missing versions (max 100).
Request Timeout (s) : Maximum wait time per network request. Default: 15 seconds. Increase for slow upstream sources (max 180 seconds).
Version Sorting and Latest Detection : Controls how the "latest version" is determined:
- Sort by publish time (default): Uses the upstream publish time.
- Sort by semantic version: Sorts by SemVer rules. Suitable for projects with security patches on older release lines, but ignores patch updates on older lines.
Release Fallback : For projects that only create tags without publishing releases. When enabled, the system falls back to fetching raw Git tags if no releases are returned by upstream.
Release Notes
Release Notes Source : Two sources are supported for release notes content:
- Use Release Notes: Uses the release notes included with the upstream release (default).
- Use Custom Changelog: Extracts release notes from a changelog file in the repository. Requires the tracker to have at least one GitHub, GitLab, or Gitea source.
When Use Custom Changelog is selected, the following fields appear:
Changelog Repository Source : When the tracker has multiple repository sources, select which one to use for reading the changelog file.
Changelog Path Template : Path to the changelog file in the repository. Supports placeholders {tag}, {version}, {major}, {minor}, {patch}. Examples:
- Single file: CHANGELOG.md
- Per-version files: docs/releases/{version}.md
- Kubernetes style: CHANGELOG/CHANGELOG-{major}.{minor}.md
File Ref : The Git ref used when reading the changelog file:
- Default Branch: Always reads the latest file from the repository's default branch.
- Release Tag: Reads the file snapshot at the corresponding release tag.
- Specific Ref: Uses the fixed ref entered below (branch name, tag, or commit SHA).
Specific Ref : Shown only when File Ref is set to "Specific Ref". Enter a branch name, tag, or commit SHA, e.g. main.
Extraction Mode : Controls how the current version's content is extracted from the file:
- Entire File: Uses the full file content. Suitable for one-file-per-version layouts.
- Matched Version Section: Finds the heading matching the current version and extracts that section. Suitable for single-file changelogs with multiple versions.
- From Subheading in Matched Section: Within the matched version section, starts extraction from a specified subheading. Suitable for Kubernetes-style changelogs.
Version Heading Template : Optional. Specifies the heading match pattern, supporting placeholders like {tag} and {version}, e.g. # {tag}. When left blank, common formats are matched automatically, such as ## [1.2.3], ## 1.2.3, and # v1.2.3.
Starting Subheading : Shown only when Extraction Mode is set to "From Subheading in Matched Section". Enter the prefix text of the subheading, e.g. Changelog since.
In general, if the upstream release includes release notes, use the default Release Notes mode. If it does not — for example:
![]() — use
— use Custom Changelog mode. When the repository contains a CHANGELOG file as the version release record, configure the fields accordingly:
![]() The final result looks like this:
The final result looks like this:
![]()
After adding a tracker, you can manually trigger a version check to verify that the version filter patterns and expected versions match your intent. Since this version data directly drives container image updates, accuracy is essential.
7. Executors
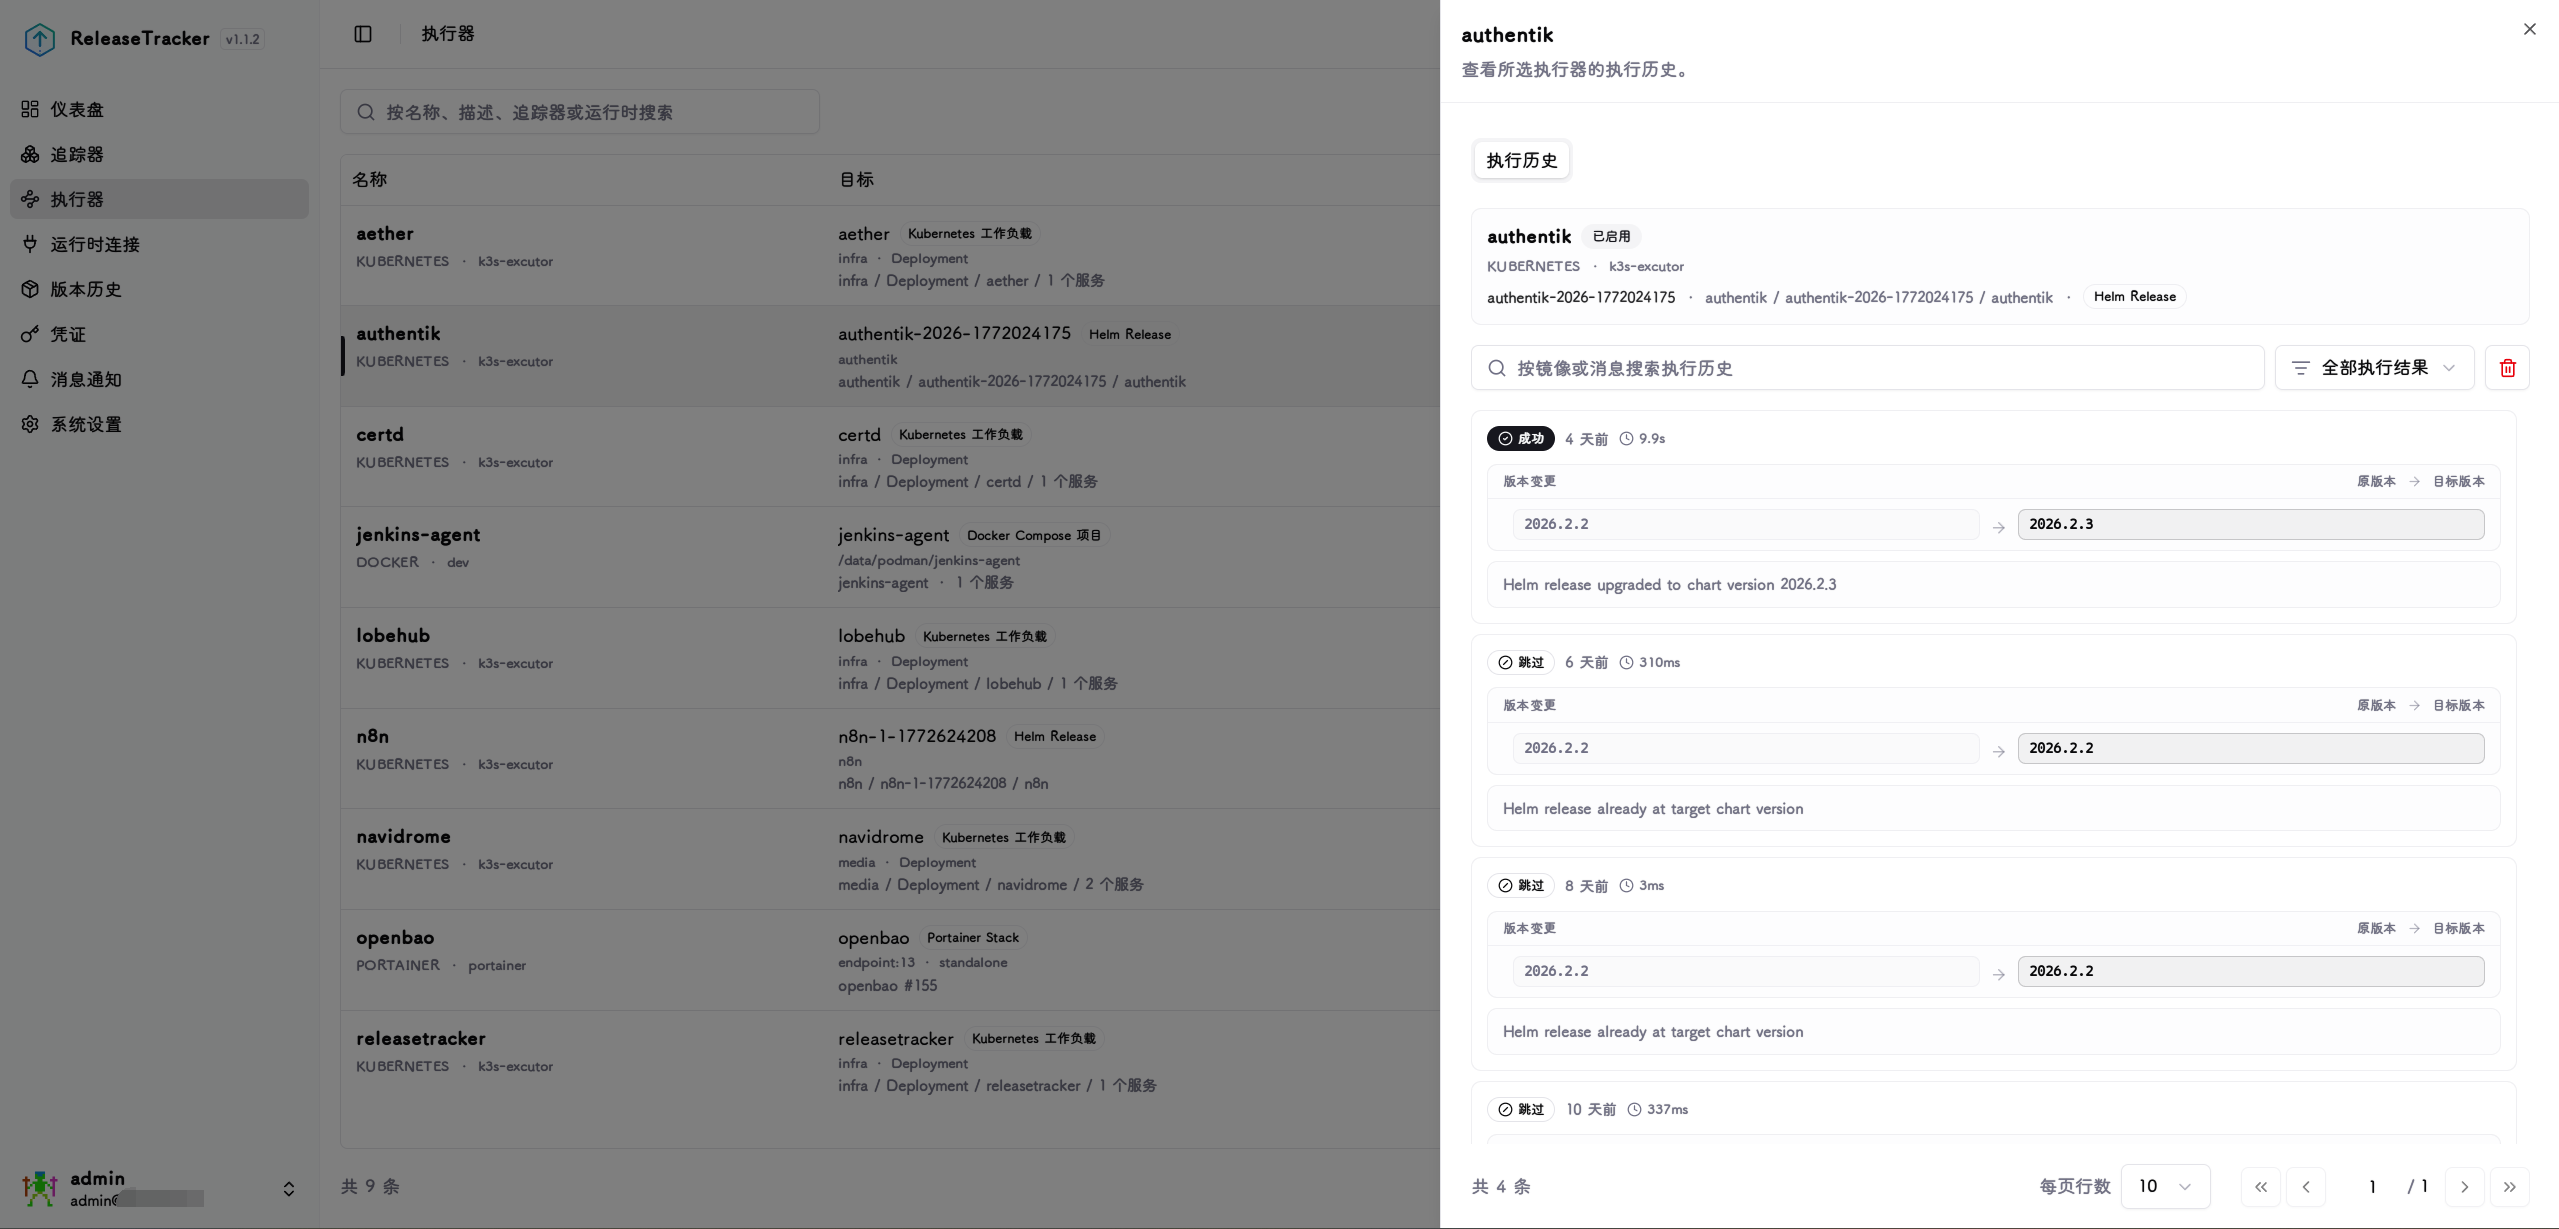
Target Discovery
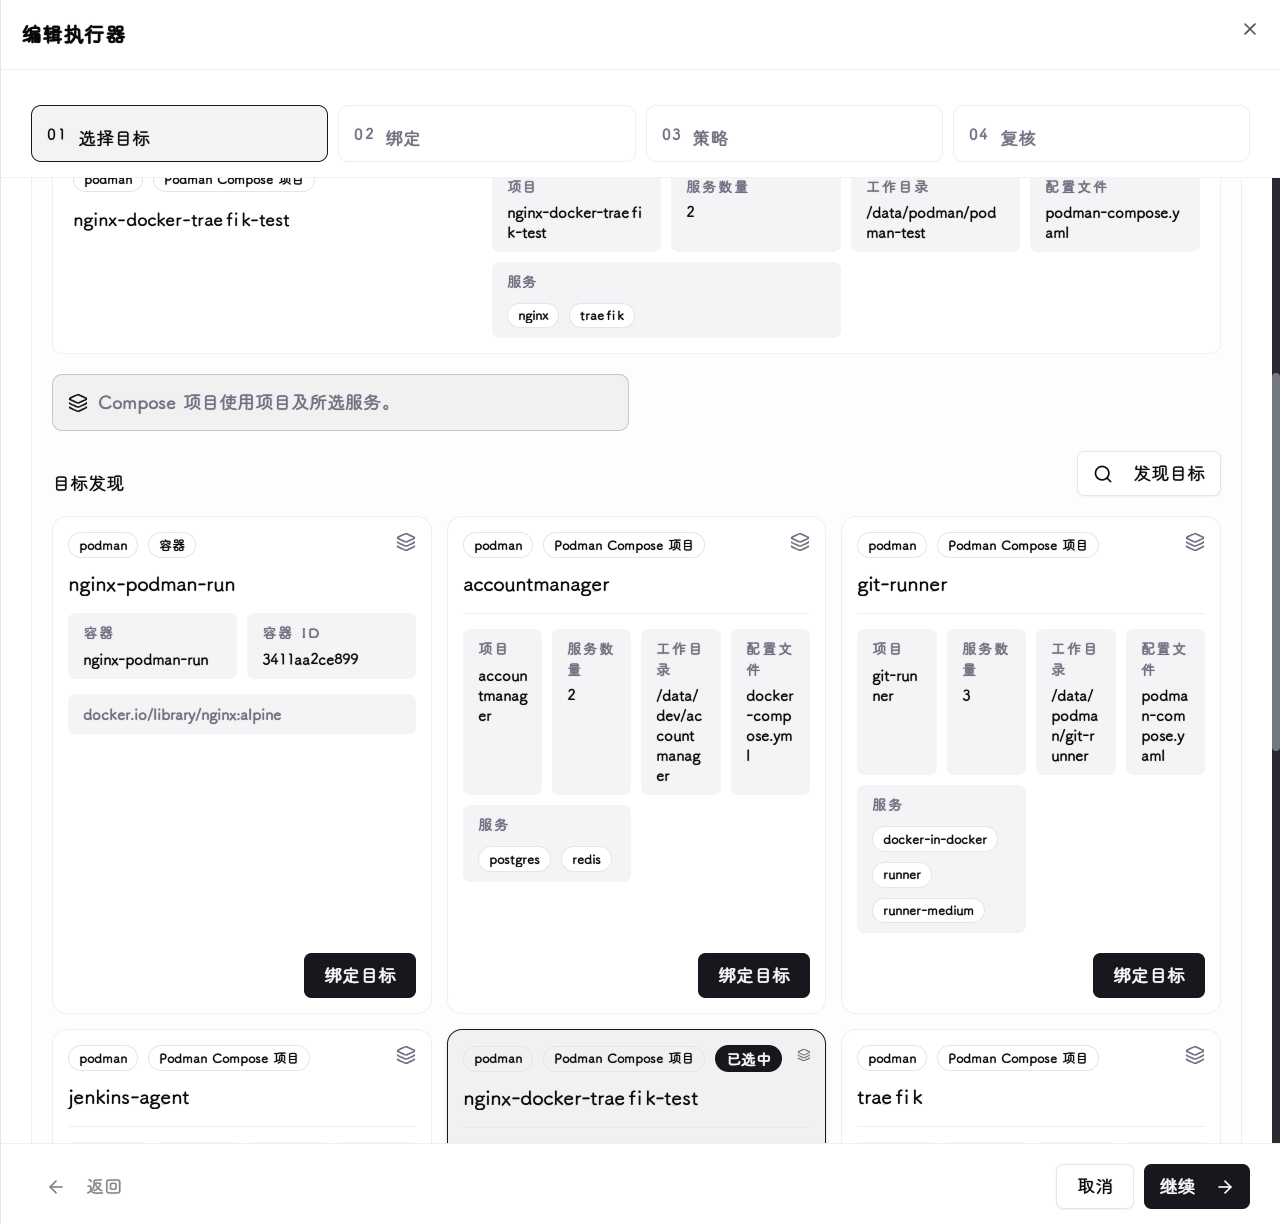
After selecting a configured runtime connection, the system automatically scans all manageable containers, services, stacks, or workloads under that connection and lists them as bindable targets.
Binding
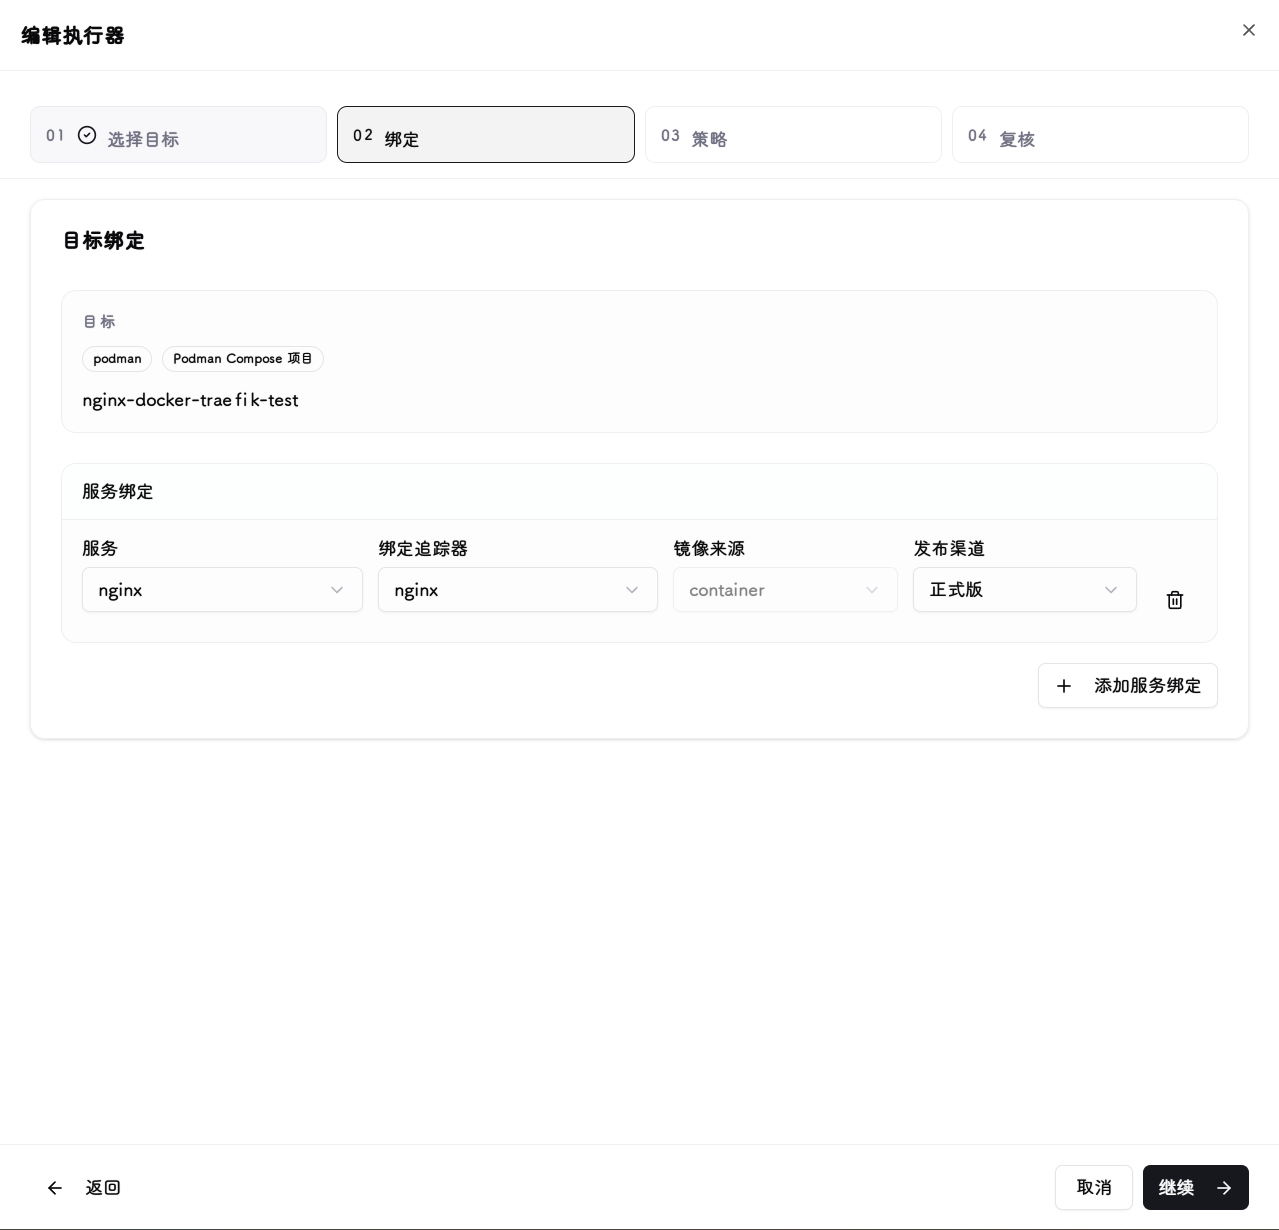
Associates a tracker's version source with a discovered runtime target, specifying which tracker's release channel drives image updates for which container or service.
For multi-service targets such as Docker Compose, Portainer Stacks, and Kubernetes workloads, each service can be configured with its own binding.
Policy
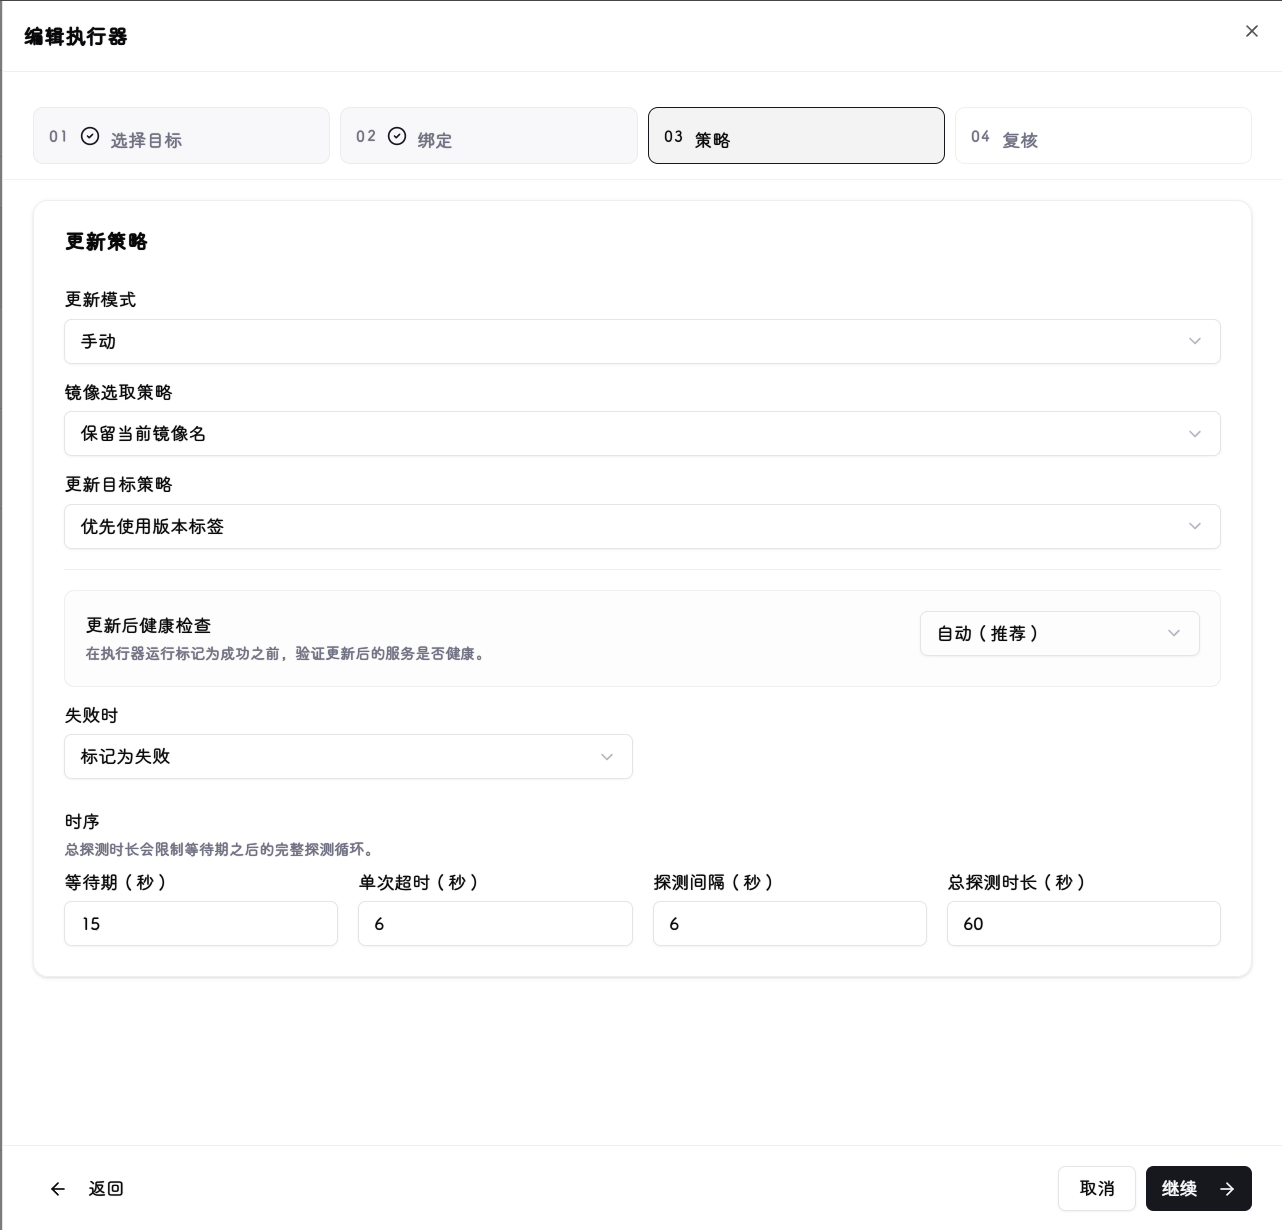
Configures how version updates are triggered: Manual mode requires explicit action in the UI; Immediate mode runs automatically when a new version is detected; Maintenance Window mode runs automatically only within a specified time window, suitable for production environments with update timing requirements.
Maintenance Window Fields (shown only when Maintenance Window mode is selected)
Maintenance Days : Select the days of the week on which updates are allowed (multi-select).
Start Time / End Time : The start and end times of the maintenance window, based on the system-configured timezone.
Image Policy Fields (not applicable to Helm targets)
Image Selection Policy : Controls how the target image is determined during an update:
- Replace current image tag: Keeps the container's current image name and only replaces the version tag.
- Use tracker image and tag: Uses the image name and version tag configured in the tracker source.
Image Reference Mode : Controls whether to reference the image by tag or digest during an update:
- Digest: Uses the image digest to pin to a specific build.
- Tag: Uses the version tag.
Health Check
After an update, the executor can perform a health check on the target service to verify it started successfully before marking the run as successful.
Strategy : Select the health check method:
- Auto (recommended): Automatically selects the appropriate check method based on runtime type.
- Runtime native readiness: Uses the container engine's or Kubernetes' native health status.
- Manual HTTP probe: Sends an HTTP request from the ReleaseTracker backend to the specified address.
- Manual TCP probe: Establishes a TCP connection from the ReleaseTracker backend to the specified address.
- Helm release status: Available for Helm targets only. Checks the Helm release deployment status.
- Disabled: No health check is performed; the update is marked successful upon completion.
On Failure : How to handle a failed health check:
- Mark as failed: Marks this executor run as failed.
- Mark as degraded: Marks this executor run as degraded (update completed but health check did not pass).
HTTP Probe Fields (shown only for Manual HTTP probe)
Host : Target host for the probe request, e.g. 127.0.0.1.
Port : Target port, e.g. 8080.
Path : HTTP request path. Must start with /, e.g. /health.
Protocol : Select http or https.
Method : Select GET or HEAD.
Expected Status Codes : Comma-separated expected HTTP status codes, e.g. 200,204. Leave blank to accept any 2xx/3xx response.
TCP Probe Fields (shown only for Manual TCP probe)
Host : Target host for the probe connection.
Port : Target port.
Timing Fields (shown when strategy is not "Disabled")
Initial Delay (s) : How many seconds to wait after the update completes before starting probes, giving the service time to start.
Single Timeout (s) : Maximum wait time for a single probe request.
Probe Interval (s) : Time between consecutive probes.
Total Probe Duration (s) : Maximum total time to keep probing after the initial delay ends.
Review
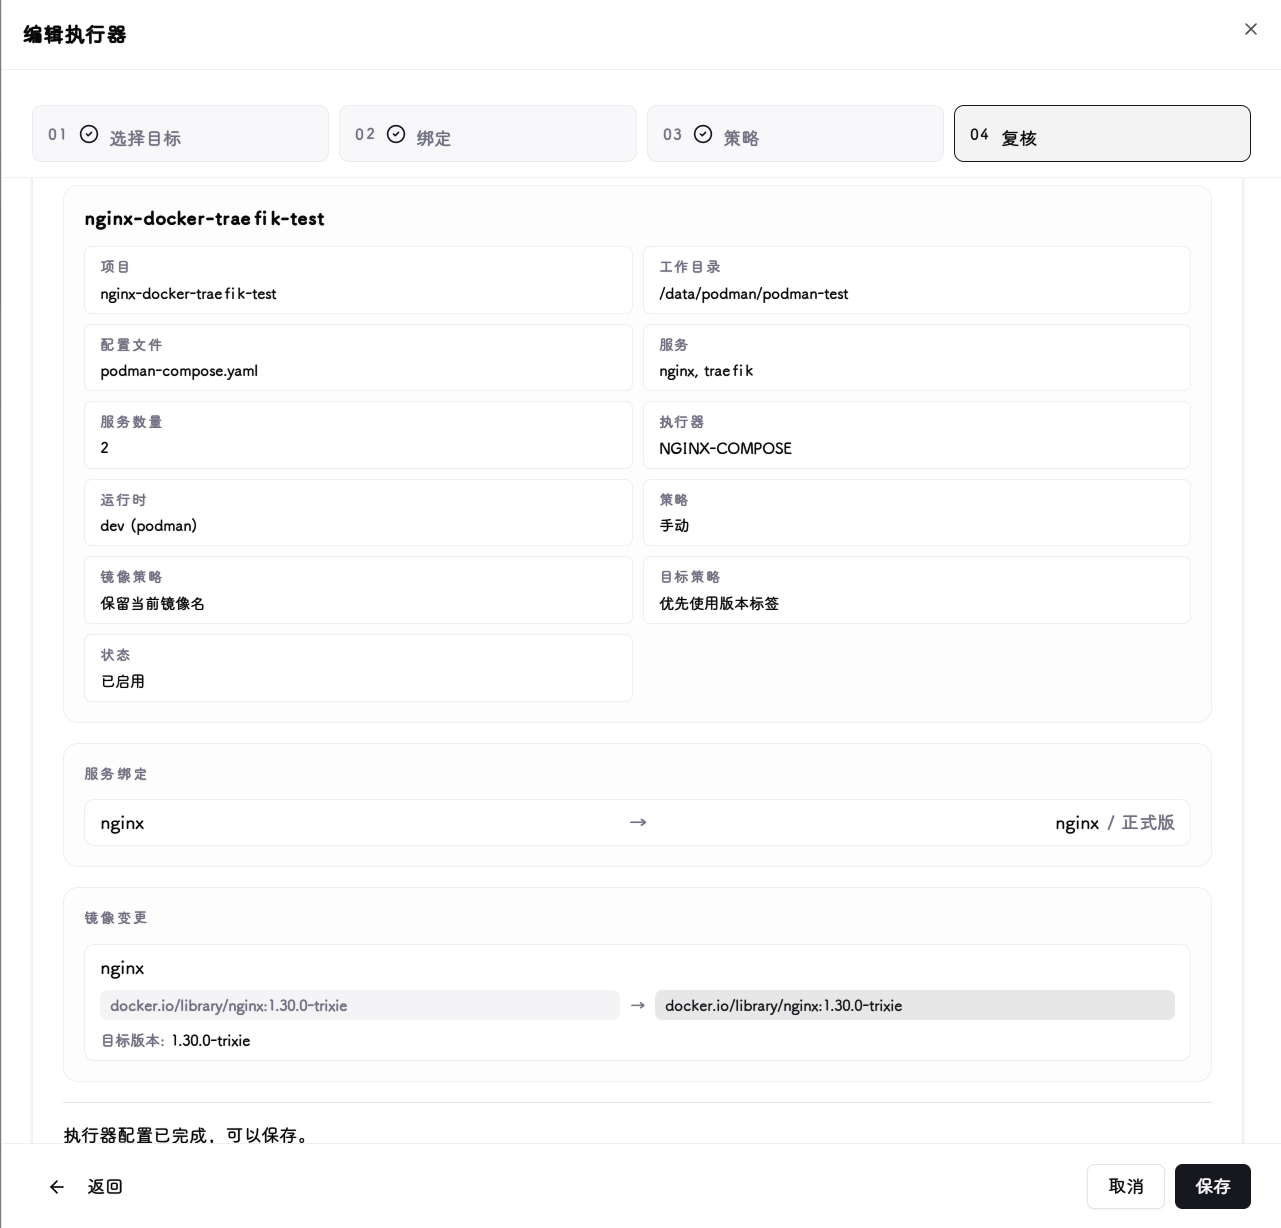
Review whether the target version matches your expectations before saving. You can use the immediate execution option to test whether the version update behaves as expected.
Snapshots
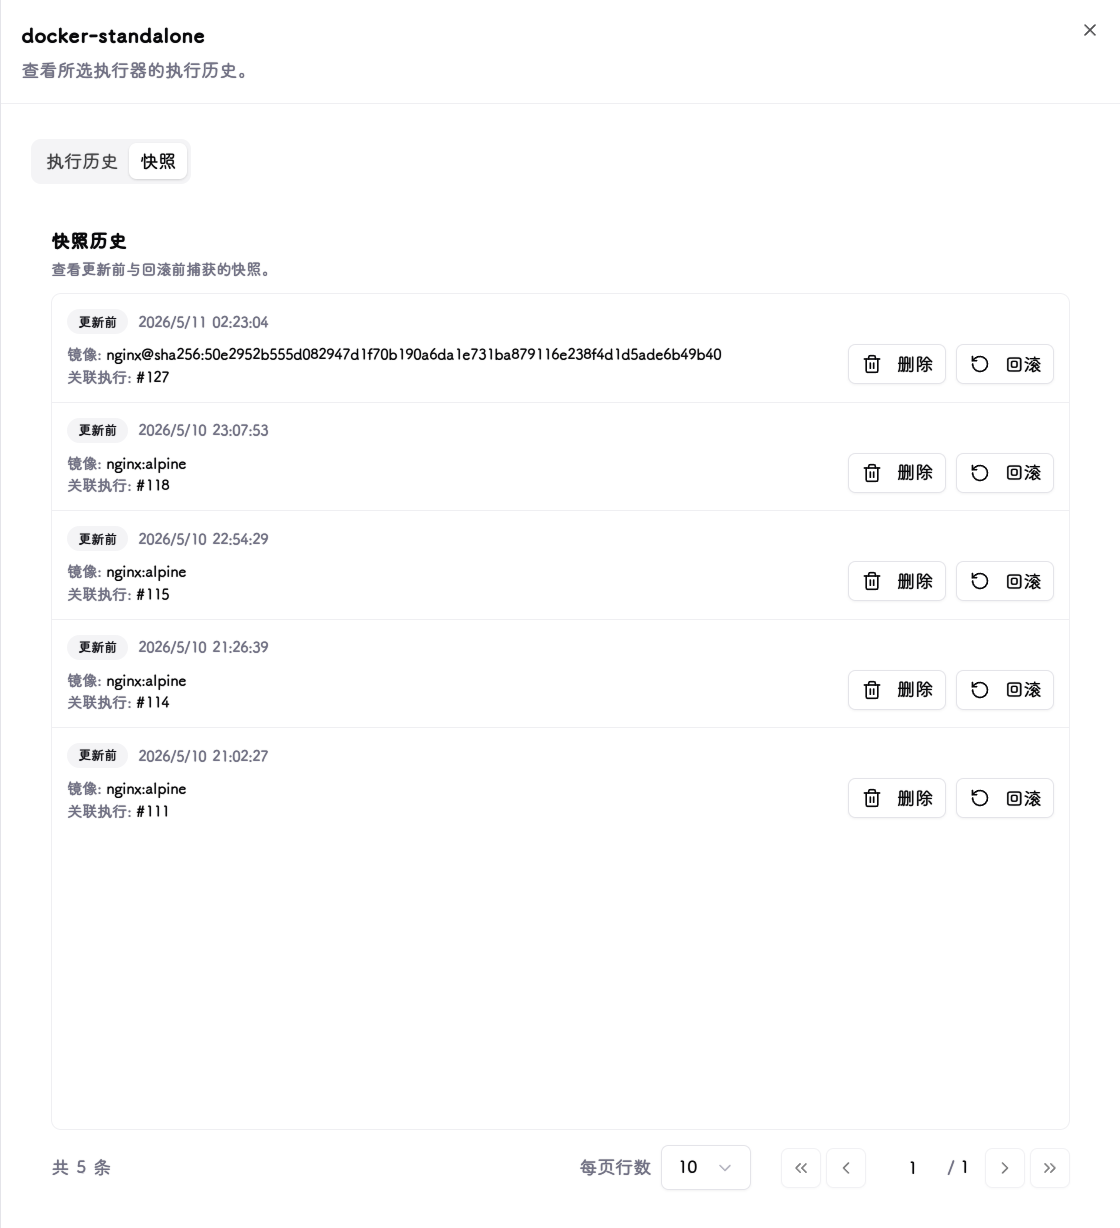
Because version updates for Docker, Podman, and Compose container groups are destructive operations (remove container → update image → start new container), full configuration restoration is not guaranteed. To guard against configuration loss, the system fetches and saves a complete snapshot of the running configuration before each update. If an update fails, the snapshot rollback feature can be used to attempt a version rollback — though whether a specific application supports rollback depends on the application itself.
Snapshot and rollback scope
Snapshots and rollback are only available for Docker, Podman, and Docker Compose targets. Portainer Stack, Kubernetes workload, and Helm Release targets use declarative management and do not require or support snapshot/rollback operations.